Every image to PPT pass splits a screenshot into two kinds of content: what can be rebuilt as native elements, and what cannot. When a slide screenshot is restored as an editable PPT, text, color blocks, lines and tables can all become native elements. Pictures embedded in the image (photos, product screenshots, illustrations, brand logos) have no matching native shape, and tracing them with polygons rarely preserves how they look. To keep this kind of content clear and usable after restoration, we crop it directly from the original image instead.
This article uses an "Investment thesis" slide as an example to show how an image to slide conversion handles this kind of content.
1. What is on this slide
By how it is restored, the content of this slide falls into three groups:
- Content that becomes native elements directly: the main title, the subtitle, four key points, the base panels and numbered pills of five cards, the bullet lists, the "Financing implications" label, the two bars at the bottom and all text. This is most of the slide.
- Simple graphics that the icon library can express: check-mark dots, the arrows between cards, a toolbox, and at the bottom a bar chart, a shield, a pie chart, a trend line, a globe, a group of people and so on. They are restored as icon elements and can still be recolored or swapped for another icon after export.
- Content that can only be handled as pictures: 6 photos in the five cards (a cargo ship terminal, the LagRide app with a car, a fleet parking lot, a charging station, a repair workshop, an aerial view of a logistics park); icons whose style has no match in the icon library (currently 63 kinds), such as a cargo ship, a car, a charging pile and a factory; and the brand wordmark "LagRide".
The third group is the "picture in picture" this article is about.
2. One baseline: the model gives only coordinates, the server crops the pixels
We do not let the model generate images, and we do not use an image editing model. These photos are already in the original image, and the most accurate approach is to crop that part of the original image as it is.
During decomposition, besides the vector elements, the model also reports the name and bounding box of each picture, for example "Cargo ship terminal: x 53, y 400, width 262, height 110". When the server receives it:
- It handles this list of regions separately from the vector elements. Vector elements are still not allowed to carry links, encoded data or any bitmap; this validation is not relaxed.
- It validates each region strictly: only the numeric box and a short name are read, and a name that looks like a link or encoded data is replaced with "Picture N"; boxes that are too small (less than 0.1% of the canvas) or too large (more than 90%) are dropped; at most 12 are kept; everything else is ignored.
- It crops the pixels from the original image you uploaded according to each box and saves them as PNG files within this job.
In other words, the model only says "there is a picture here". The picture content always comes from your own original image, and the model has no way to put external content into the PPT.
The prompt also requires the model to: keep boxes tight around the picture; output text outside the picture as text elements as usual, without including it in the box; output the card panel behind the picture as a native element as usual; and keep using icons for simple icons that the icon library can express.
3. After cropping: remove the background or not
The crop is a rectangle. Photos are rectangular to begin with and can be kept as they are. Logos and illustrations, however, usually sit on a solid background, and a rectangular crop brings a white border with it that looks out of place on a colored card. So for every picture the tool decides automatically whether to remove the background. The whole process is deterministic pixel computation and does not involve the model:
- Decide whether the background is solid. Take the outermost 2 pixels of the crop. If more than 85% of these pixels are close to one color, the graphic is considered to sit on a solid background; otherwise it is considered a photo, kept as a rectangle and left unchanged.
- Remove only background connected to the border. A fill runs inward from the four edges, and only areas that are connected to the border and close to the background color become transparent. Parts inside the graphic that have the background color (such as white highlights or gaps inside an icon) are not connected to the border and are kept.
- Soft edges. Transparency changes smoothly with color difference, so edges do not look jagged.
- Remove the white fringe. The transparent boundary shrinks inward by one pixel, and semi-transparent edge pixels have the mixed-in background color subtracted, so no white outline appears even on a dark background.
4. A run on this slide
To observe the background removal algorithm on its own, we marked 11 regions of this slide by hand and processed them with the same algorithm the product uses (this step does not involve the model; the boxes were given by hand):
| Region | Box [x, y, w, h] | Decision | Result |
|---|---|---|---|
| Cargo ship terminal photo | 53, 400, 262, 110 | Not a solid background | Kept as rectangle |
| LagRide app and car | 392, 400, 245, 110 | Not a solid background | Kept as rectangle |
| Fleet parking lot | 705, 400, 240, 110 | Not a solid background | Kept as rectangle |
| Charging station | 1008, 400, 128, 110 | Not a solid background | Kept as rectangle |
| Repair workshop | 1142, 400, 135, 110 | Not a solid background | Kept as rectangle |
| Logistics park aerial view | 1340, 400, 283, 110 | Not a solid background | Kept as rectangle |
| Cargo ship icon | 126, 296, 112, 68 | White background #FEFEFD | Background removed |
| LagRide wordmark | 430, 312, 160, 50 | White background #FEFEFE | Background removed |
| Car icon | 790, 292, 82, 70 | White background #FDFEFE | Background removed |
| Charging pile icon | 1026, 302, 58, 60 | White background #FDFEFE | Background removed |
| Factory icon | 1510, 298, 72, 62 | Not a solid background | Kept as rectangle |
The image below places the results on a checkerboard; transparent areas show the checkerboard (enlarged 2x):
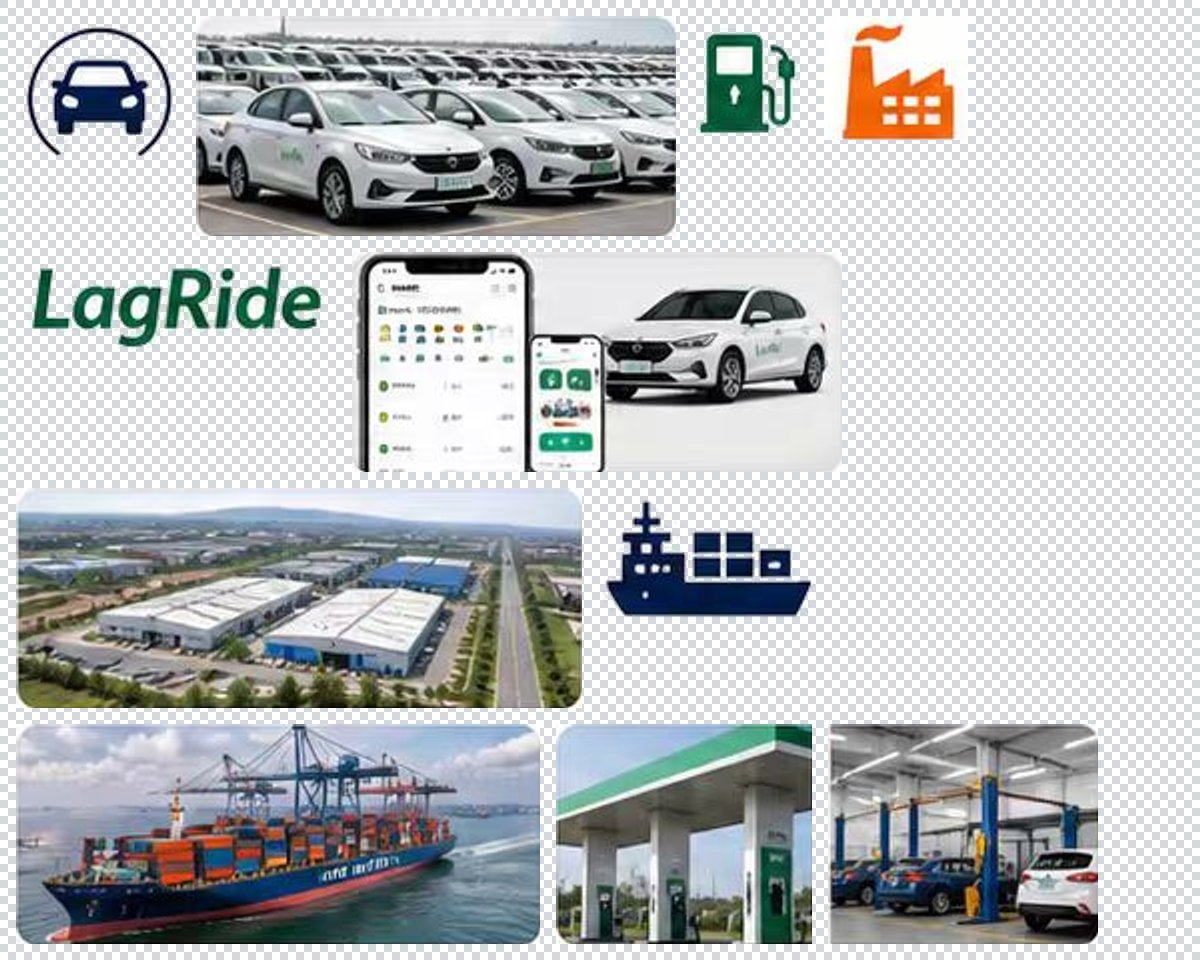
All 6 photos are classified as photos and kept as they are, with fully opaque pixels. The white backgrounds of the cargo ship, car and charging pile icons and the LagRide wordmark are removed, the four corners are fully transparent, and the graphics themselves, including the thin ring around the car, are kept.
The factory icon shows why the tightness of the box matters: this box is too tight, the chimney and the factory roof touch the border, and the outer ring contains a large orange area, so less than 85% of it is close to one color and the picture is kept as a rectangle. Expanding the box outward by 10 pixels and processing it again detects the white background and removes it. For this reason, when you use "Convert to image" manually, the server expands the selection by at least 4 pixels or 4%, so that the border falls on the background.
5. How you can adjust the result
The regions marked by the model are not always accurate, so each picture can be handled individually in the interface:
- Element list: after the vector elements, all pictures are listed with a checkerboard thumbnail and a tag ("Cutout · background removed", "Cutout · no solid background", "Web image" and so on). Clicking a row in the list or a picture on the canvas selects it in both places.
- "Remove background" switch: when the automatic decision is wrong, you can turn it off or on manually, and the server regenerates the picture from the original image.
- "Convert to image": if a picture was restored as a group of polygons, select these elements and click "Convert to image". The server crops a picture from the original image using their bounding box to replace them, and the original polygons are deleted.
- "Remove": remove pictures you do not need.
All of these operations can be undone step by step. When the visual recheck takes its screenshot, cutouts are drawn into the preview as they actually look, so the recheck model sees the final result. The integrity check, the visual recheck and imageToEditablePPT-Agent are also told that these regions are already pictures, so they should not report them as missing or draw them again.
6. Export
When the PPTX is exported, each cutout is read directly from the PNG saved in the job and embedded as a native picture, without contacting any external address — the last step that keeps an image to PPT result editable in PowerPoint. PNGs with the background removed keep their transparency channel. In PowerPoint they are ordinary pictures that can be moved, scaled, cropped and replaced.
7. Current limits
- Only solid backgrounds can be removed. Graphics on gradient or photo backgrounds are kept as rectangles; you can process them in PowerPoint after export.
- Photos with rounded corners keep background-colored corners. The photos on this slide are all in rounded cards, so the corners of the cropped rectangles are white. Background removal is not applied to photos, so the white corners stay; they are invisible on a white card and show on a colored background.
- Text over a photo appears twice. If text sits on top of a photo, the crop takes it along, and the text is also restored as a text element. The prompt asks for boxes that avoid text; if it still happens, delete the extra text element or remove the picture.
- Pictures are always on the top layer and currently cannot be dragged or resized on the canvas; you can adjust them in PowerPoint after export.
For more rules on picture sources, redesign and export, see Topic: how we handle images in a PPT.